Battery switch on travel trailer function is crucial for managing your RV’s power. Understanding how your battery switch works is key to preventing dead batteries and ensuring you have power when you need it. This guide covers different switch types, troubleshooting common issues, and essential safety precautions. We’ll walk you through everything from basic functionality to maintenance and replacement, empowering you to confidently manage your travel trailer’s electrical system.
We’ll explore the various types of battery switches – from simple disconnect switches to more complex systems – and explain their advantages and disadvantages. We’ll delve into the intricacies of power flow between your house batteries and your tow vehicle, and show you how to prevent those frustrating dead battery situations. This guide will equip you with the knowledge to troubleshoot problems, perform maintenance, and even replace your battery switch if necessary.
Battery Switch Types in Travel Trailers

Choosing the right battery switch for your travel trailer is crucial for managing your power system effectively and safely. Different switches offer varying levels of control and protection, impacting your ability to use house and chassis batteries independently or together. Understanding these differences will help you make an informed decision.
Battery Switch Types
Travel trailers typically use one of several common battery switch types. These switches control the flow of power from your batteries to the trailer’s electrical system. The selection depends on your needs and the complexity of your setup.
| Switch Type | Description | Advantages | Disadvantages |
|---|---|---|---|
| 1-2-Both Switch | This is a simple switch with three positions: 1 (connects only the house battery), 2 (connects only the chassis battery), and Both (connects both batteries in parallel). | Simple to use and understand; provides basic control over battery usage. Cost-effective. | Offers limited control; doesn’t protect against accidental discharge; less suitable for complex systems with multiple batteries or sensitive electronics. |
| Disconnect Switch | A simple on/off switch that completely isolates the batteries from the trailer’s electrical system. Often used as a primary safety switch. | Provides complete battery disconnection for safety and preventing parasitic drain; simple and reliable. | No control over which battery is used; requires manually turning the switch on and off each time. |
| Perko Switch | A more advanced switch that often includes additional features like circuit breakers or fuses for added protection. Some models allow for selecting individual batteries or combining them. | Offers more control than a simple 1-2-Both switch; includes safety features like circuit breakers; can handle higher amperage loads. | More complex and expensive than simpler switches; may require more technical understanding to operate. |
| Automatic Charging Relays | These aren’t strictly switches, but they automatically manage the charging of your house battery from the alternator or solar panels while preventing back-feeding. | Automatic charging; prevents overcharging; protects sensitive electronics. | More complex setup; requires additional components; can be more expensive than a simple switch. |
Choosing the Right Switch
The best battery switch for your travel trailer depends on your specific needs and setup. Consider the number of batteries you have, the complexity of your electrical system, and your budget when making your selection. A simple 1-2-Both switch is adequate for basic setups, while a Perko switch or a system with automatic charging relays is better suited for more complex systems or those requiring enhanced safety features.
Always consult a qualified RV technician if you are unsure about which switch is right for you or if you need help with the installation.
Troubleshooting Common Battery Switch Issues: Battery Switch On Travel Trailer Function
Your travel trailer’s battery switch is a critical component, ensuring you can easily switch between your trailer’s batteries and shore power. Problems with this switch can leave you stranded without power. Understanding common issues and how to troubleshoot them is key to maintaining your RV’s electrical system.Identifying common problems with your battery switch often involves a visual inspection and some basic electrical checks.
Neglecting maintenance can lead to more serious problems down the line, so regular checks are recommended.
Visual Inspection for Damage and Corrosion
A thorough visual inspection is the first step in troubleshooting any battery switch problems. Start by disconnecting the negative (-) battery cable from your battery bank. This is a crucial safety precaution to prevent accidental shorts. Next, carefully examine the switch itself. Look for signs of corrosion, which typically appears as a white, green, or blue powdery substance around the terminals or on the switch body.
So, you’re an audiophile who loves to travel? Awesome! Check out this guide on creating the perfect audiophile travel setup for your next adventure. It’s all about packing light but smart, prioritizing sound quality even on the go. Then, once you’ve mastered the basics, dive deeper into more advanced techniques with this other resource on audiophile travel setups – it covers some really cool portable gear and tips for optimizing your listening experience in various environments.
Happy listening!
Loose connections are another common culprit; check for any wires that are not firmly secured. Pay close attention to the switch’s handle; if it’s loose, difficult to move, or feels damaged, it might need replacing. Inspect the wiring for any fraying, melting, or damage. If you notice any significant damage or corrosion, you’ll need to address those issues before proceeding.
Troubleshooting Flowchart
The following flowchart Artikels a systematic approach to resolving common battery switch problems. Remember safety first; always disconnect the negative battery cable before performing any checks or repairs.
- Problem: Battery switch doesn’t turn on or off smoothly.
- Check: Inspect for corrosion on terminals and switch body. Clean with a wire brush and baking soda solution. Tighten all connections.
- If this solves the problem: Re-connect the battery cable and test the switch.
- If the problem persists: The switch may be internally faulty and require replacement.
- Problem: No power to appliances even with the switch in the “on” position.
- Check: Verify the switch is correctly set to the desired position (e.g., battery, shore power, both). Check fuses and circuit breakers both in the switch and elsewhere in your RV’s electrical system.
- If this solves the problem: The issue was a blown fuse or tripped breaker.
- If the problem persists: Check for loose connections at the battery, switch, and appliances. If connections are secure, the problem could be a faulty wire, a dead battery, or a problem with the appliance itself.
- Problem: Switch feels loose or damaged.
- Check: Carefully examine the switch for physical damage. If the switch is cracked or broken, it will need replacement.
- If this confirms damage: Replace the switch with a new one of the same type and amperage rating.
Safety Precautions When Working with Battery Switches
Working with your travel trailer’s battery system requires caution. Improper handling can lead to serious injury from electric shock, burns, or explosions due to the release of flammable hydrogen gas. Always prioritize safety to prevent accidents and ensure a smooth experience.Disconnecting the negative battery terminal before working on the switch is paramount. This prevents accidental short circuits and protects you from potentially lethal electrical shocks.
Remember, electricity always seeks the path of least resistance, and your body could become that path if precautions aren’t taken. Working on the system with the negative terminal disconnected ensures that the circuit is broken, eliminating the risk of electrical current flowing through you.
Necessary Safety Equipment
Before starting any work on your travel trailer’s battery system, gather the necessary safety equipment. This isn’t just a good idea; it’s essential for your safety and well-being. Failing to do so could have serious consequences.
- Insulated Gloves: Heavy-duty, rubber insulated gloves rated for the voltage of your battery system are crucial. These gloves provide a barrier between your skin and the electrical current, preventing shocks.
- Eye Protection: Safety glasses or goggles protect your eyes from sparks, splashes of battery acid, or other debris that could be thrown during the process.
- Closed-toe Shoes: Protect your feet from potential spills or dropped objects.
- Ventilation: Batteries release hydrogen gas, which is highly flammable and explosive. Ensure adequate ventilation in the area where you are working, ideally outdoors or in a well-ventilated space.
- Baking Soda: Keep a container of baking soda nearby to neutralize any battery acid spills. Battery acid is corrosive and can cause burns.
Additional Safety Considerations
Beyond the basic equipment, there are several additional safety measures to observe. These precautions will help minimize risks and ensure a safe working environment.
- Inspect the Battery: Before beginning any work, visually inspect the battery for any signs of damage, such as cracks, corrosion, or leaks. A damaged battery poses a higher risk of accident.
- Use the Correct Tools: Employ insulated tools specifically designed for working with electrical systems. Avoid using metal tools, as they can conduct electricity and cause a short circuit.
- Avoid Contact with Terminals: Do not touch the battery terminals while working. Even with gloves, minimize contact to prevent accidental shorts.
- Neutralize Spills Immediately: If any battery acid spills, neutralize it immediately with baking soda. Quickly clean up the spill to prevent corrosion and further damage.
- Consult a Professional: If you are unsure about any aspect of working with your travel trailer’s battery system, consult a qualified professional. It’s always better to be safe than sorry.
Wiring Diagrams and Schematics
Understanding your travel trailer’s electrical system is crucial for safe and reliable operation. Wiring diagrams provide a visual roadmap of how the various components, including the battery switch, are interconnected. This section will help you decipher these diagrams and ensure your battery switch is correctly wired.
A clear understanding of your travel trailer’s wiring diagram is essential for troubleshooting electrical problems and performing maintenance. These diagrams use standardized symbols to represent different components and their connections, making it easier to trace the flow of electricity. While specific diagrams vary between manufacturers and models, the basic principles remain the same.
So, you’re an audiophile who loves to travel? Awesome! Check out this guide on building the perfect audiophile travel setup for your next adventure. It’s all about finding that sweet spot between portability and sound quality. Then, once you’ve got your portable system dialed in, consider exploring different listening environments – you might find that a jungle soundscape enhances your music appreciation even more! For another perspective on lightweight audio setups for globetrotters, explore the tips and tricks at audiophile travel aetup to refine your packing list and enhance your travel audio experience.
Happy listening!
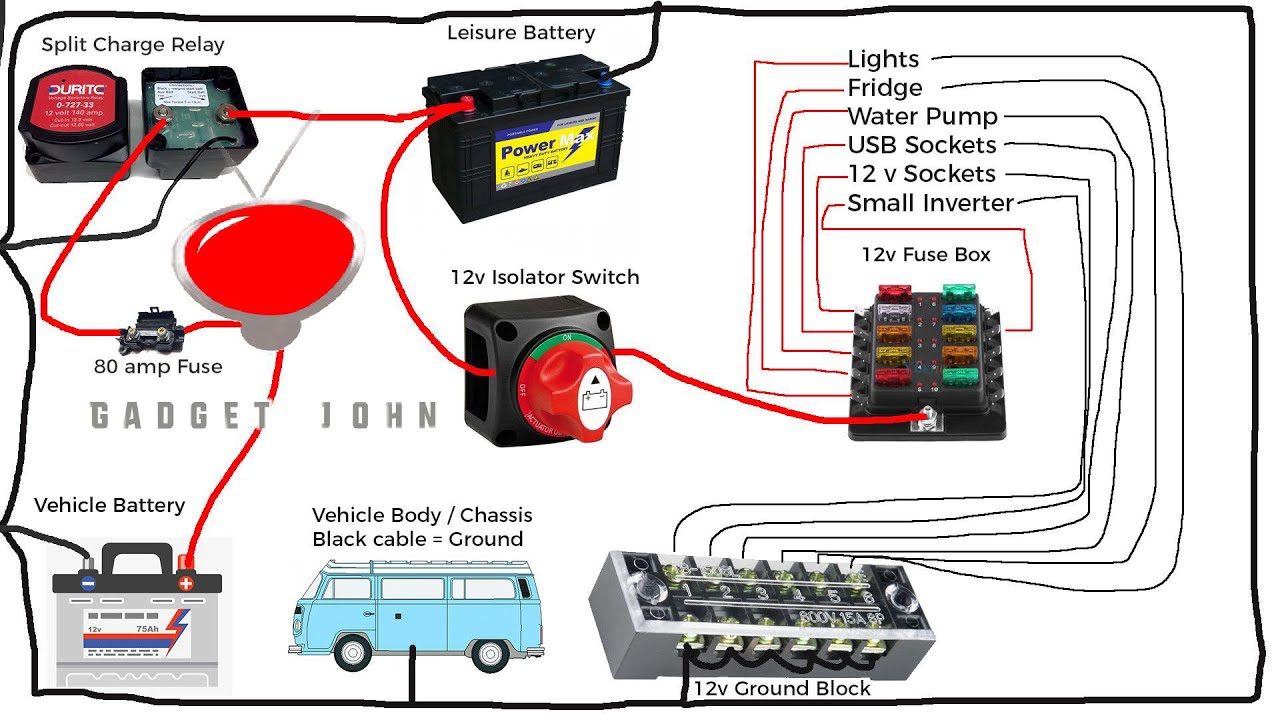
Typical Battery Switch Wiring Diagram
The following table illustrates a simplified wiring diagram for a typical battery switch installation in a travel trailer. Remember that this is a basic representation and your specific setup might have additional components or slightly different configurations.
| Component | Connection |
|---|---|
| Battery (House Battery) Positive (+) Terminal | Battery Switch Input (+) |
| Battery (House Battery) Negative (-) Terminal | Chassis Ground |
| Battery Switch Output (+) | Fuse Block Input (+) |
| Fuse Block Output (+) | 12V DC Electrical System (Lights, Appliances, etc.) |
| Fuse Block Ground (-) | Chassis Ground |
Interpreting a Travel Trailer Wiring Diagram
Travel trailer wiring diagrams typically use symbols to represent various components. For example, a circle might represent a battery, a rectangle could represent a fuse block, and a switch is often depicted as a switch symbol. Lines connecting these symbols show the path of the electrical current. Following these lines, you can trace the flow of power from the battery, through the battery switch, to the various electrical components in your trailer.
Pay close attention to the labels and numbers used to identify different circuits and wires. These diagrams are often color-coded, with different colors representing different circuits (e.g., 12V DC, 120V AC). A correctly interpreted diagram allows you to easily identify the source of an electrical problem and trace it back to its root cause.
Correctly Wired Battery Switch Setup
A correctly wired battery switch setup ensures that power flows smoothly and safely to your trailer’s electrical system when the switch is on, and completely isolates the battery when the switch is off. The positive (+) cable from your house battery connects to the input (+) terminal of the battery switch. The output (+) terminal of the switch connects to the input (+) terminal of your fuse block.
The negative (-) terminal of the house battery should be directly connected to a clean, solid chassis ground point. The fuse block’s negative (-) terminal also connects to a separate, clean chassis ground point. This ensures a complete circuit when the switch is ON, and completely isolates the battery from the trailer’s electrical system when the switch is OFF.
All connections should be secure and properly insulated to prevent short circuits and potential fire hazards. Cable routing should be organized and neatly secured to prevent damage and ensure easy access for future maintenance. The use of appropriately sized fuses and circuit breakers is crucial for protecting your electrical system from overloads.
Battery Switch Maintenance and Replacement
Keeping your travel trailer’s battery switch in top condition is crucial for reliable power and preventing costly repairs down the road. Regular maintenance ensures the switch operates smoothly, providing safe and consistent power to your appliances and systems. Neglecting maintenance can lead to corrosion, overheating, and ultimately, failure. This section details a routine maintenance schedule and the procedure for replacing a faulty switch.Regular maintenance is straightforward and should be part of your overall RV maintenance routine.
A well-maintained switch will last much longer, saving you time and money in the long run.
Routine Battery Switch Maintenance
A simple inspection and cleaning routine will significantly extend the life of your battery switch. This involves visually checking for corrosion and ensuring all connections are tight and secure. Cleaning removes any buildup that could impede functionality or create safety hazards.
- Visual Inspection: At least twice a year, or more frequently if you live in a humid climate, inspect the switch for any signs of corrosion (white, green, or powdery deposits) on the terminals or the switch body itself. Look for any loose wires or damage to the switch housing.
- Cleaning: Use a wire brush or sandpaper to gently remove any corrosion from the terminals. A baking soda and water paste can also be effective for cleaning. After cleaning, apply a thin layer of dielectric grease to the terminals to prevent future corrosion. Ensure all connections are tightened securely.
- Functional Test: After cleaning and tightening connections, test the switch to ensure it’s functioning correctly. Turn the switch on and off, checking the power flow to your appliances. If you notice any irregularities, such as flickering lights or inconsistent power, further investigation may be necessary.
Battery Switch Replacement Procedure, Battery switch on travel trailer function
Replacing a faulty battery switch requires some basic electrical knowledge and tools. Safety should always be your top priority when working with electrical components. Always disconnect the battery before starting any work.
- Disconnect the Battery: This is the most crucial step. Disconnect both the positive (+) and negative (-) battery terminals. Use a wrench or socket to loosen the terminal connections.
- Remove the Old Switch: Carefully remove any wires connected to the old battery switch. Take photos or make notes of the wire connections to ensure correct re-wiring during installation. Use a screwdriver or other appropriate tools to remove the switch from its mounting location.
- Install the New Switch: Mount the new battery switch in the same location as the old one. Ensure it is securely fastened.
- Reconnect the Wires: Connect the wires to the new switch, carefully matching them to the connections on the old switch (refer to your photos or notes). Double-check all connections for proper tightness.
- Reconnect the Battery: Reconnect the battery terminals, ensuring they are securely fastened.
- Test the Switch: Turn the switch on and off, testing the power flow to your appliances to verify correct operation.
Mastering your travel trailer’s battery switch is a vital skill for any RV owner. By understanding its function, performing regular maintenance, and knowing how to troubleshoot problems, you can ensure reliable power on every adventure. Remember, safety is paramount when working with electrical systems – always disconnect the negative terminal before working on the switch. With the information in this guide, you’ll be well-equipped to keep your travel trailer’s electrical system running smoothly, leaving you free to enjoy the open road.
FAQ Corner
What happens if my battery switch is left in the “off” position?
Leaving the switch off completely disconnects your house batteries from the rest of the trailer’s electrical system, preventing power drain. However, you won’t have power to anything inside the trailer.
How often should I inspect my battery switch?
Ideally, inspect your battery switch at least once a year or before each extended trip. Look for corrosion, loose connections, and any signs of damage.
Can I use a different type of battery switch than what’s originally installed?
While you can replace it, ensure the replacement switch is compatible with your trailer’s electrical system. Consult your trailer’s wiring diagram or a qualified RV technician if unsure.
My battery switch is corroded. Can I clean it?
Yes, but disconnect the negative terminal first! Use a wire brush and baking soda solution to clean the terminals and switch. Apply dielectric grease afterward to prevent future corrosion.
